How to Download and Install macOS Ventura?
This article is focused on How to Download and Install macOS Ventura on your MacBook. You may say it is an upgrade from macOS Monterey to macOS Ventura.
M2 silicon chip is designed for the newest models of MacBook pro, MacBook Air, Mac Pro and iMac. There’s also a new operating system called macOS Ventura which is mostly compatible on the Apple Silicon chips (M1 Mac). This is a new evaluation for Apple Desktop ecosystem. Speaking of comparing macOS Ventura to macOS Monterey, there are minor but amazing updates. For instance, System Preferences is entirely redesigned and now it is called “System Settings”. A new look similar to Linux Distros have been applied to the system settings.
You can see the front of your disk by using the continuity app and turning your iPhone into a webcam. This feature is small but quite handy for YouTubers (Gamers, Educational tutors etc.). The Entire operating system has been updated with small features but a certain important feature for productivity has been introduced. This feature is called stage manager which is the alternative of Snap layouts on Windows 11.
Compatible Macs capable of running macOS Ventura:
- iMac 2017 and later
- iMac Pro 2017 and later
- MacBook Air 2018 and later
- MacBook Pro 2017 and later
- Mac Pro 2019 and later
- Mac Studio 2022
- Mac mini 2018 and later
- MacBook 2017 and later.
In the WWDC 2022 event, Apple has dropped 2015 and 2016 MacBook entirely from supporting macOS Ventura. My guess is that apple is slowly moving from the Intel processors into the Apple silicon environment completely. You must follow Mr. Macintosh for future updates to of installing macOS Ventura on Unsupported Macs.
Backup Important Files
Before getting started with how to download and install macOS Ventura on your system, you must make sure that your important files are backed up. On a serious note, even though apple has tested the macOS Ventura almost 3 months on the beta profiles but still you may face issues. A small bug can wipe your entire data. That’s why you must be cautious.
There are many ways and methods available that can be used to simply backup your important files. For instance cloud is the best option (if you have purchased one) or else you can with an external drive.
Steps to Backup Your Important Files using the Time Machine:
- Connect the external drive to your Mac.
- On the keyboard hold command + Space buttons to open the spotlight.
- Search for Time Machine and launch it.
- Click on the Select Backup Disk and locate the External drive.
- Following that it will start taking backup of your system.
- You can check the status of backup on the menu bar.
Download macOS Ventura
There are many methods and ways that you can use to download macOS Ventura. In fact the easiest method is to get it directly from the App Store, that is if you are playing by the book. To get the latest version of macOS Ventura using the App Store, make sure that you are running the latest version of Monterey. The other requirement for getting macOS Ventura is to sign in with your Apple ID. If you are ready and good to go just follow the blur steps to get the latest version of macOS Ventura.
Download macOS Ventura using App Store:
- Launch the App Store on the macOS Monterey.
- Tip on the search icon and search for macOS Ventura.
- From the search results click on macOS Ventura and click on get.
- You will have to wait until you get the macOS Ventura downloaded (This section depends on your internet speed.)
- Once the macOS Ventura is downloaded, you will find it under the applications.
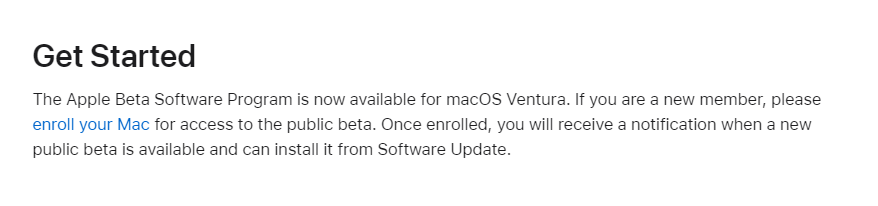
Download macOS Ventura Beta using a Developer account:
- Visit the apple beta program software page.
- If you have not signed up for the apple beta program, sign up right away with your Apple ID. Since it is the public beta of macOS Ventura you can download it and install it right away.
- After signing up or signing in to the apple beta program page, go to the macOS category and scroll down and click on enroll your Mac.
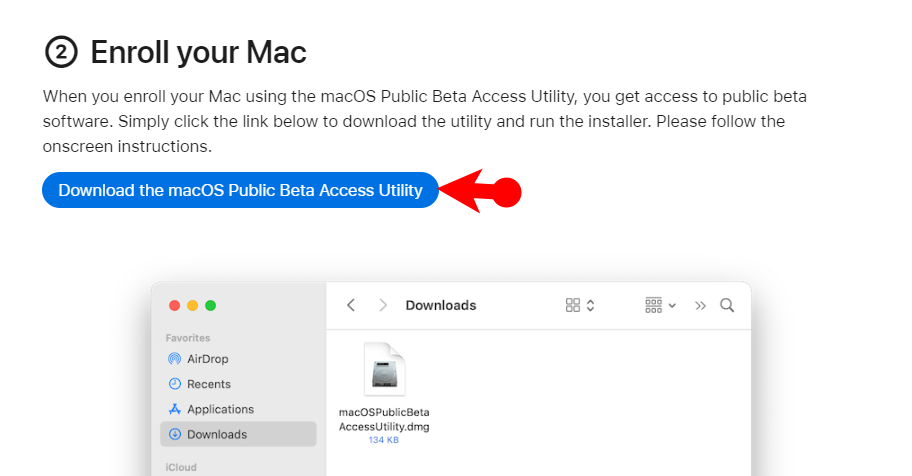
- On the next page under Enroll, your Mac will find a link to download the macOS Ventura access utility, click on it.
- Now it’s going to download the MacOS public beta access utility.
- You must launch the macOS public beta access utility. The Utility will ask to use the time machine to back up your files, click continue and move on.
- Agree> again click agree to the terms and conditions of using apple software. Following that> click install> than enter your login password to confirm the changes.
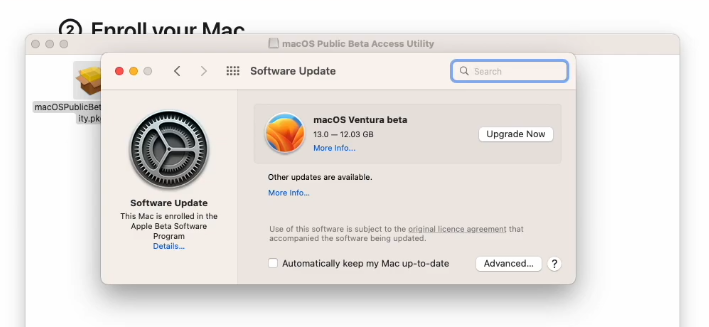
- The system preferences will open after installing the macOS public beta access utility. It will take you to the update section where you will the option to “upgrade Now”.
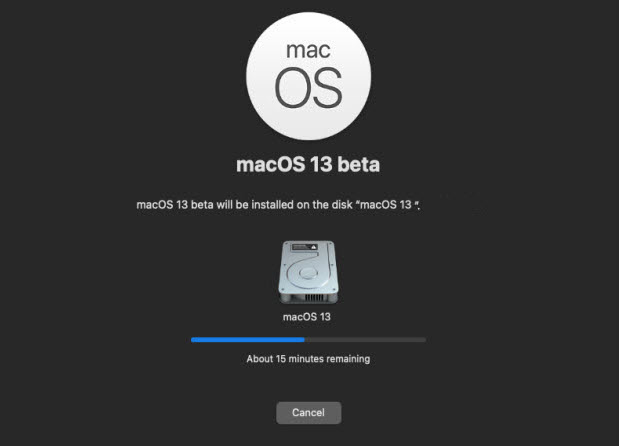
- Until now everything is set up, you have to click on the upgrade now and wait for it until it is downloaded. It is going to take quite a lot of time and besides it also depends on the speed of your Internet. Once it is done your Mac is going to restart automatically.
- You need to log in with your credentials after the Mac is restarted, after that, you will see the macOS 13 installer has launched. If it did not launch, you can find the installer in the applications directory, just double-click on it and it will launch.
Download macOS Ventura without a Developer account:
You can still get the macOS Ventura latest version and the beta version without a developer account. The truth of the matter is that open source community has provided many methods. For instance, you can use the GibmacOS (A script created to get only macOS). The other method is to directly get the macOS Ventura Installer Assistant from the Apple servers. MrMacintosh.com is the website where you can get the latest version any macOS.
Install macOS Ventura
The final step of this article is to install macOS Ventura on your system. By now I am assuming that you already have access to the macOS Ventura on the Applications directory.
- Click on it to launch.
- Click Continue.
- Agree to the Terms and conditions.
- Select the drive to Install macOS Ventura
- Enter your password and wait for installation to complete.
- After that the system will restart, than you have to go setting up your new mac settings such as language, Time Screen etc.
Conclusion:
This is how you can use to Download and install macOS Ventura on your Mac. Please keep in mind that the beta version is not stable so you have to either wait for the final version or go with the risk of using macOS public beta.