
Each device has a serial number which is used to identify or specify the identification of the device. For instance, if you want to install the drivers of your HP computer or laptop, using the serial number you will be easily find the drivers, hardware specs directly into the HP driver’s website. Serial number usually comes in numeric or Alphanumeric e.g. 0233456779 or A1G2C6F4. You might have noticed that HP doesn’t show the serial in its interface nor does it display the popular information tools. However, you could find the serial number of your HP laptop with a simple command, peek in your BIOS or you could find it inside your hardware. So in today’s post, I will guide you How to Find Your Laptop Serial number in Windows 11 and Windows 10.
Before Your begin:
You can find the serial numbers on a label at the back of your laptop or Desktop which maybe attached at the back of the PC. Or it comes on a piece of paper which is attached with the package or box of your computer. But in some cases, you won’t find it at the back of your laptop or you have lost the box of your computer.
Note: For this article, I will be using Lenovo laptop to guide you How to Find Your Laptop Serial Number.
Find Your Laptop Serial Number
It is very necessary to know the serial number of your laptop or any other laptop. Another thing that is necessary to know is the Product number, and Model number of your laptop in order to download drivers. So, you will learn 3 ways how to check Lenovo laptop serial number in Windows 11.
Note: Serial Number could refer to as Serial, Serial number, Serial NO, Asset number, Service tag and S/N.
1. Find Your Laptop Serial Number using Command Prompt
The easiest method that you can use to Find Your Laptop Serial Number is by using command prompt, this method will work on any laptops (Dell, HP, Lenovo, Acer, ASUS, MSI, Microsoft Surface etc).
Steps to View Your Computer’s Serial Number using CMD:
- Open the Start menu and type Command Prompt or Press Windows + R, and type CMD. Do keep in mind that using Terminal or PowerShell will also work if you are comfortable with.
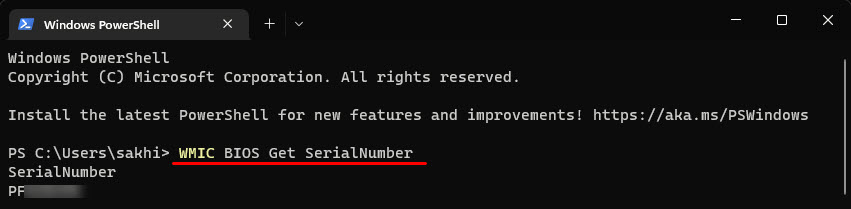
- In the CMD, Terminal or PowerShell execute the WMIC BIOS Get SerialNumber command.
- Congratulations for Finding your computer’s or laptops serial number easily using CMD.
Note: Some users have reported that after executing the command, they won’t get the Serial Number of their computer. Instead, the command will show something like “0”, which is filled O.E.M or entirely a blank space instead of the Serial Number.
What could this mean?
Well, the answer to this problem is your computer’s manufacturer. Why, Because WMIC command is getting the serial number details from the BIOS or so called Firmware. If it is showing such things, it means your Laptop’s manufactures have not attached the serial number details in the BIOS.
2. Find Your Laptop Serial Number using BIOS
The second method that you can use to find Your laptop serial number is using BIOS. Before proceeding, please keep in mind that if the WMIC Command did not show the serial number, it means the serial number is not available within the BIOS of a Your PC too. It will be useless to access it just to find the serial number of your computer. However, if you do not have the password of your PC to access the CMD, PowerShell, or Terminal to find out the serial number, accessing the BIOS will certainly help.
Steps to Get to the BIOS of Your Laptop:
Step 1. Access BIOS
I know two methods that I can access the BIOS of my Laptop but their may be more, but for now, follow the below steps.
Method 1: Access BIOS using Advanced Startup
- Open the start menu of computer.
- Click on the Power icon.
- Hold the Shift Key on the Keyboard and Click on the Restart. Or you can follow the long path to boot your computer to Advanced startup options. Here is the long path, open the Settings app> Windows Update> Advanced Options> Recovery> Click on Restart Now in front of Advanced Startup.
- Your Laptop will restart, then you have to choose Troubleshoot> Advanced Options> UEFI Firmware Settings and click restart.
Method 2: Access BIOS using Boot Key
- The computer manufacturer’s build a specific key on the keyboard that upon the launch of the computer, you press it to Access the BIOS. For Instance, HP’s BIOS is key F10, Lenovo’s BIOS is One Key Recovery, Dell’s BIOS key is F12, Acer’s BIOS is F2 and so on. It is better to search for them yourself based on model of your computer.
Step 2. Find Your Laptop Serial Number
Once you have successfully accessed the BIOS, on the main tab you will find the Serial Number Easily.
3. Find Your Computer’s Serial Number using the Manufacturer website
Another official method that you can use to find your computer serial number is to use the manufacturer’s website. Let me explain a bit clearly, the moment you will clean install your Windows 11 computer, you must install the drivers too. fortunately there are several ways and methods that you can install the drivers, however the official method would be to visit driver page of that computer.
- For instance, I will install drivers of Lenovo, the first step to search on google for Lenovo drivers.
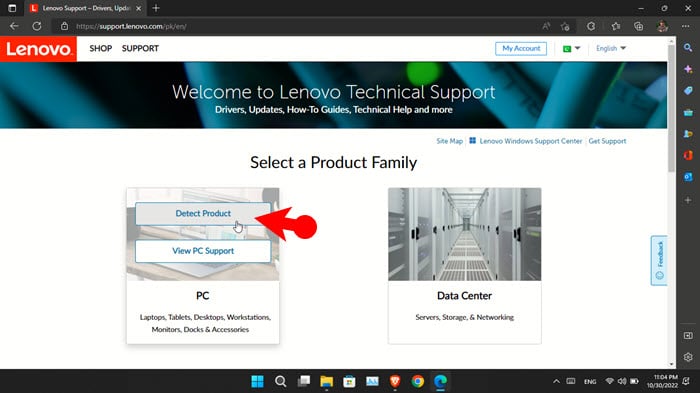
- I will open the official website of Lenovo for drivers.
- Click on Detect Product, then Install the requires software that it provides.
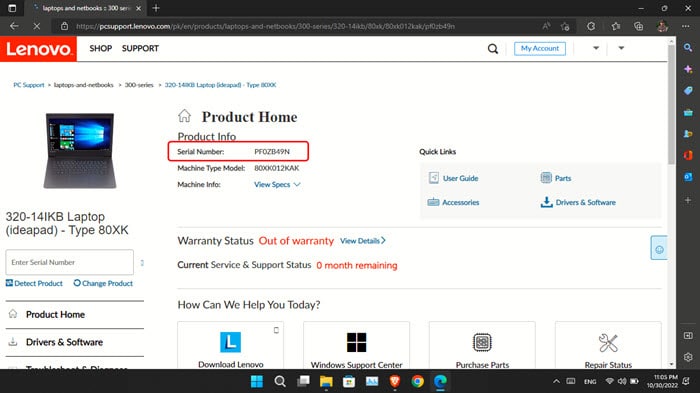
- Once everything is installed, on the website you will your computer’s detail including the serial Number.
Click on the Below Images to Zoom.

4. Find Your Laptop’s Serial Number under the Battery
Believe it or not but it it is true because you can find the serial number of your computer under the battery compartment. It is most likely available for older laptops that has the ability to remove the battery without opening the back of your laptop with screwdriver. So, remove the battery of your computer and underneath you will find the serial number.

Bonus Tips For HP Computers
For HP laptops there is another bonus tip that you can use it to find your Laptop’s serial number. Even though I am assuming that these days many users are not using it but in the past this app used to be preinstalled when you purchased a new HP Laptop. This App is called the HP Support Assistant. Its main goal is to provide to assistance for hardware diagnostics. Still, using this App, you can find your computer’s serial number.
- Download and Install the HP Support Assistant, if you don’t have it.
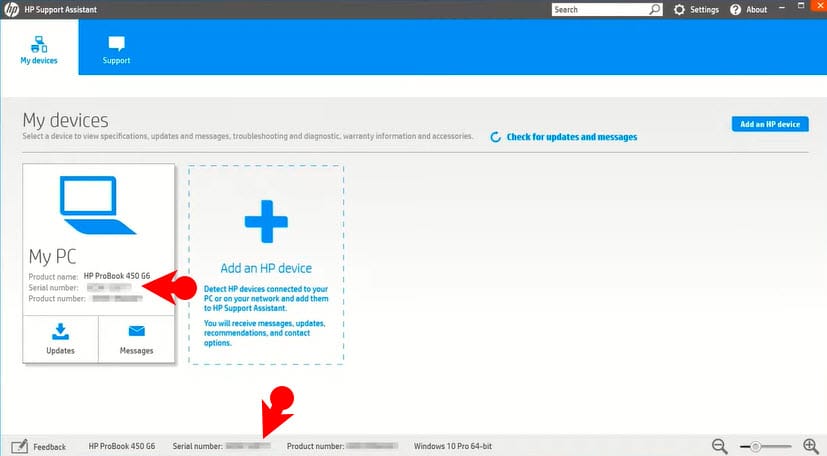
- After the installation of the App, open and go to My Device.
- Under My device, you will find your computer along side the serial number.
Conclusion
These are the techniques and methods that you can use to Find Your Laptop Serial number of anyone. Overall, I would suggest to look for the Serial number on Box of your system, over a label attached in back of your Laptop or using CMD.
FAQ:
What is the use of the serial number?
Serial numbers are very important to every computer. Because it is used to identify your computer or laptop by the manufacturer. Some people could have access to your laptop with the help of your serial number.
How many digits does a serial number have?
Some of the serial numbers contain six or seven numbers. But some of the serial numbers even contain twenty numbers or more.
Do all laptop contains the same serial number?
A serial number is a very unique string to your computer. No two laptops don't contain the same serial number.
Also Read:


4 Comments